Blog
News and insights from ExtraDigital, a marketing agency based in Kent.
Marketing & Web Development for 20+ years

Turn Your Employees into Your Strongest Brand Advocates on LinkedIn
11 December 2025
Read our latest recommendations on how to beat the TikTok algorithm and go viral in 2024. Boost your reach and engage your brand’s audience with …

Understanding and Reporting Meta’s Metric Changes From 2025 to 2026
10 December 2025
Meta is retiring Reach, Impressions and Engagement. This is in Meta Business Suite’s overall account performance reporting, including Page Insights and content-level dashboards. These changes …

Digital Content Creation for Brand Engagement
2 December 2025
What does the future of digital content creation look like? Follow these tips to redefine and elevate your brand engagement.

The Overlooked Power of Retargeting: Maximising Conversions Without Increasing Ad Spend
20 November 2025
Most brands spend heavily to attract new visitors but overlook the fastest way to grow: re-engaging people who already showed interest. Retargeting, also known as …

Black Friday & Holiday Marketing – Winning the Peak Season
14 November 2025
As we step into the heart of the Black Friday and holiday marketing season, the atmosphere couldn’t be busier. Competition is fierce, ad costs are …

International Digital Marketing: How to Win Customers Across Borders
12 November 2025
When considering multilingual marketing, you must understand your audience – Cultural nuances, Localised platforms, Keyword Research & Good quality localisation.

Generative Engine Optimisation (GEO): How to Get Your Content Featured in AI‑Powered Search
29 October 2025
Introduction AI-powered search is rewriting the rules of visibility. Platforms like Google’s Search Generative Experience (SGE), Perplexity, and ChatGPT now deliver instant, summarised answers directly …

From Clicks to Customers: How a Strategic Digital Marketing Funnel Boosts ROI
21 October 2025
A digital marketing funnel is the structured journey that leads users from initial interest to final purchase, optimising conversion at each stage. In this article, …

Why TikTok Shop Could Be Your Brand’s Biggest Growth Channel
15 October 2025
The Rise of Social Commerce Social media is ever evolving, and with that, social commerce is also growing rapidly. Consumers are no longer just browsing …

Content That Converts: How to Blend Creativity with Data-Driven Marketing
9 October 2025
Effective content is more than eye-catching words or visuals. It must persuade, guide and convert. At ExtraDigital, our approach balances originality with analytics, helping brands …
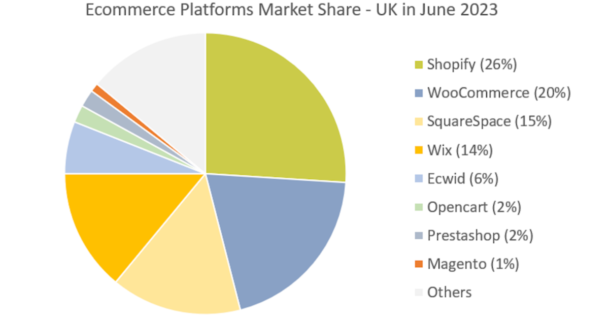
Most Popular eCommerce Platforms in the UK in 2025
8 October 2025
The UK eCommerce market continues to mature. Growth is expected to slow to approximately 3.6 % in 2025, driven by market saturation and stabilising consumer behaviour. …

Hyper-Personalisation with First & Zero-Party Data: Building Trust While Driving Growth
25 September 2025
Personalisation has long been the holy grail of digital marketing. Customers expect brands to understand them, anticipate their needs, and deliver relevant experiences. But with …
Join over 300 happy customers