 HootSuite is becoming a very popular tool for organisations and individuals. The way it works is that it allows you to manage the multiple social media accounts and use in one place. This means that you don’t need to log into all of your platforms separately to get the same message out, saving you time and ultimately money. There are other types of software that will give you a similar ability but HootSuite is by far the best one on the market at the moment.
The best use of HootSuite is for use with your Twitter account but you can use it for other social platforms such as Facebook, LinkedIn, Foursquare, Wordpress and Mixi, whether they are your own person accounts or business pages. At the moment Hoot Suite will not connect to personal Google+ profiles but it will allow you to manage your Google+ page. The same applies to Gmail, YouTube, Instagram, Flickr, Tumblr, you can view them on HootSuite but you cannot post messages via HootSuite.
You can get access to free versions of HootSuite but these free accounts usually limit each tab to only three accounts.
For those who don’t know how to make the most out of HootSuite we have complied the following guide for you to use.
A Guide to HootSuite for Beginners
To start a HootSuite account you simply log in and set up your account as instructed by Hootsuite, the system will then guide you through the basics of connecting networks and organising your streams.
To open a tab, simply click on the plus button to the right of the home button on the left hand side of the page. To make it easier to use, you can customise each tab by simply clicking on a tab name and changing to whatever title you prefer.

Below the tabs are the buttons ‘Add Stream’ and ‘Add Social Network’, use these buttons to add what social platform you wish to have on your HootSuite account and then within each social network you can add streams from the social network you have selected. For example, if you selected the Facebook social platform using the ‘Add Social Network’ button then you could add the streams ‘News Feeds’, ‘Events’ and ‘Wall Posts’ to the tab using the ‘Add Stream’ button. Streams can easily be closed, re-opened and refreshed; you also have the ability to have half of one social platform streams on one tab and half on another and connect them together, meaning that the limit of a free account can be played with.

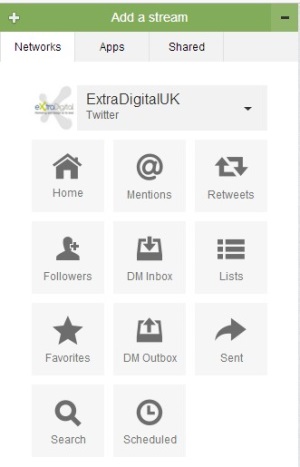
You will see that the green menu tab shows the networks that you have connected to your HootSuite account and using this menu will allow you to select the streams (timeline, scheduled tweets and mentions) you wish to monitor. Due to variations in the social platforms, the stream options themselves will vary depending on the social platform selected. For example, Facebook will show the news feed stream, events stream, wall posts streams etc where as Twitter will show the incoming tweets stream and scheduled tweets stream.
Please note that if you cannot see the green menu tab then it may have shrunk to a green plus box in the bottom right hand corner of the screen.
To create a stream for a specific hash tag or to get involved in a Twitter chat you can simply use the search option (shown as a magnifying glass in the top right). The search box will also keep you informed with what is trending on Twitter currently.
Posting Using HootSuite
How your HootSuite is set up the next part of this guide takes you through how to post on your social platforms. The way that you can post on HootSuite is incredibly simple, at the top left of the screen you will see the following bar.

This bar will enable you to create new posts to send to any or multiple accounts of yours. Once you click on this bar it will open, showing the following.

Simply compose your message in the text box, place any URL links in the ‘Add a link’ box and then click ‘Shrink’ for a bit.ly type link, attach any items using the paperclip button, schedule the post (will cover in more detail below) using the calendar button, put your location in using the pin point button and/or look at the privacy options of the post using the padlock button
Once you have your message ready to send you need to select the platform or platforms you wish to post the message to using the drop down next to the outline of a person in the box to the right of the message box. You can select as many as you wish and remove them from the option simply by clicking on the image connected with the platform.
Once you are happy with the message and your selection of social platform/s to post the message to then simply click on the ‘Send Now’ button and your message will be posted where instructed and appear on the appropriate streams you have created.
How to Schedule using the Scheduling option on HootSuite

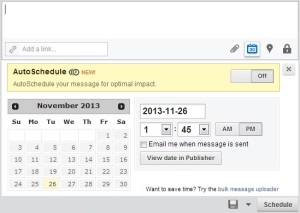
Scheduling on HootSuite can be done by using the calendar button which appears below the compose a message field. Clicking that button will bring up a drop down of options.
You can select the date and time of when you would like to schedule the message to post using the options provided. There is also the option to auto schedule, this option will post your message at a time when statistically people who might be interested in your post will be on Twitter, very similar to the practices of Social Bro.
The Added Bonuses of HootSuite
There are many additional bonuses that HootSuite can provide you with. They include...
- In Pro or Enterprise accounts (not free accounts) you can customise your shorted links.
- You can track the metrics of the posted links, access to this can be found by using the left sidebar’s ‘Analytics’ section. This data can be produced in reports for specific accounts, engagements and data. Free users can only create two reports but the data in these reports is of a good quality and very useful.
- HootSuite offers a number of browser extensions for Chrome and Firefox users so that you can post on HootSuite without actually opening up your HootSuite account (Called Hootlet – very similar to Pinterest’s Pin-It button).
- There is a mobile app for HootSuite so you can use the program even when on the go.
Important Factor to Remember – Security
With all of your social platforms accessed from the one place, security is of even more importance. To make your account more secure go to ‘Settings’>’Account’>’Authentication’ (found on the left side bar) and choose from the options how you would prefer to connect to HootSuite. HootSuite will take you through the process of making your site more secure.
This Guide was written by Katie Butcher


